When people hear that you are a stay at home mom, they often assume that you sit around eating Bon-Bons all day and watching soap operas. But as moms (stay at home or working) we all know that there is never enough time in the day to get everything done. We are in perpetual motion, just like our kids. We are cleaning, cooking, teaching, chauffeuring, changing diapers, doing laundry, buying groceries, running errands, and on and on. Then we have those things that we do because we enjoy - blogging, crafting, spending time with our spouses, but frequently even these things are done on a schedule that must be completed (or at least we feel compelled to complete by a certain time so that we don't fall behind). But how often do we take the time to truly relax and enjoy some time for ourselves? Not often enough.
Every once in awhile, this hits me head on. I just have a day when I feel overwhelmed and unmotivated. Yesterday was one of those days. The house needed picked up, I needed to take care of mother's day and birthday gifts, I needed to weed the flower beds, I needed to go to the post office, I needed to finish sewing Little Bear's diaper inserts, I needed to do laundry, I needed to cook supper, I needed to play with Little Bear, I needed to exercise the dog, I needed to spend time with Papa Bear, the floors needed scrubbed, the toilets needed cleaned, I needed to iron, I needed to work on my blog, I needed to schedule a play date, I needed return some emails, and on and on and on... And I know that I am not the only one who gets these days.
So do you know what I did? I did the bare minimum to get through the day - the things that truly were important (played outside with Little Bear, Papa Bear and the dog then warmed up left overs for supper). And after Little Bear went to bed, I took a long shower, snuggled up in bed, finished a book and went to sleep early. And it was so worth it! I woke up this morning with the same list of things to do, but a whole different attitude. And did the world end yesterday when I didn't accomplish my to do list? Absolutely NOT!
I know that we all know how important "me" time is and I also know how far down it falls on our to do lists. But I just wanted to remind everyone what a difference it can make when you take a little time and spoil yourself, especially with Mother's Day coming up next weekend. It doesn't have to be anything big or fancy, just take some time for yourself. You deserve it - celebrate yourself and all that you do for your family! :o) And Happy early Mother's Day!
Saturday, April 30, 2011
Thursday, April 28, 2011
Tot Tip: Keep warm with a cape!
When Little Bear was tiny I didn't have to worry about putting a coat on him. If it was cold, I would simply throw a blanket over his car seat and carry the whole seat with me. Now that we have transitioned him into his convertible seat, this is not possible (really even if that seat was designed to be removable, there is no way that I could lug that thing plus Little Bear around!).
The new car seat poses several issues when it comes to cold weather. 1. Little Bear is a furnace! He sweats in his car seat without wearing a coat. If I put a coat on him, he would be miserable. 2. Safety. Putting a bulky coat underneath the car seat straps compromises the ability of the straps to properly fit your child snugly.
So what to do? For awhile I tried putting his coat on and off each time we got in or out of the car. What a hassle! Then I tried using a poncho (that came up like a blanket over the seat), but I couldn't leave it on in the car seat because Little Bear was too hot. Finally I figured it out! A cape with a hood.
Little Bear already had a monkey blanket with a hood and it made the perfect cape. I simply keep it in the car and when I take Little Bear out of his seat, I put the hood on. The blanket naturally falls around him like a cape and I just pull it closed at the neck. It's easy on, easy off. Little Bear is cool, comfortable and safe in his car seat without a coat but quickly and easily covered up to stay warm and dry when we venture out. Plus its easy to wash and stash (in the car, in the cart, where ever). And should the need arise, you have an extra blanket with you. (I discovered that it was super easy to put the cape on and then lay Little Bear on the changing table in public restrooms for diaper changes!)
I think for next year I am going to sew some velcro at the neck, just to make things even easier!
The new car seat poses several issues when it comes to cold weather. 1. Little Bear is a furnace! He sweats in his car seat without wearing a coat. If I put a coat on him, he would be miserable. 2. Safety. Putting a bulky coat underneath the car seat straps compromises the ability of the straps to properly fit your child snugly.
So what to do? For awhile I tried putting his coat on and off each time we got in or out of the car. What a hassle! Then I tried using a poncho (that came up like a blanket over the seat), but I couldn't leave it on in the car seat because Little Bear was too hot. Finally I figured it out! A cape with a hood.
Okay, I'm pretty sure that I have better pics somewhere, but Little Bear is waking up now! :o) |
Little Bear already had a monkey blanket with a hood and it made the perfect cape. I simply keep it in the car and when I take Little Bear out of his seat, I put the hood on. The blanket naturally falls around him like a cape and I just pull it closed at the neck. It's easy on, easy off. Little Bear is cool, comfortable and safe in his car seat without a coat but quickly and easily covered up to stay warm and dry when we venture out. Plus its easy to wash and stash (in the car, in the cart, where ever). And should the need arise, you have an extra blanket with you. (I discovered that it was super easy to put the cape on and then lay Little Bear on the changing table in public restrooms for diaper changes!)
I think for next year I am going to sew some velcro at the neck, just to make things even easier!
Wednesday, April 27, 2011
Wordless Wednesday - Easter 2011
Tuesday, April 26, 2011
Fabric Easter Basket
I know that Easter is over. But I was so busy trying to finish this project that I didn't get a chance to share it with you before the fact! So I figured that it was better late than never. Maybe you can get a head start on next year!
At any rate, when I started thinking about Easter this year I wanted to get a special basket that Little Bear could keep and use for years to come. Naturally I figured that anything homemade would have special significance, but how in the world would I make an Easter basket? Never fear - there are more creative bloggers out there than me! And thankfully I found one. :o)
While it was an old post, I found the directions that I needed here, on the Moda Bake Shop blog. For the most part, I followed their tutorial but I did make a few modifications:
1. While the directions say to use a Moda honey bun, I could not find one with colors/patterns suitable for a little boy's Easter basket. Instead, I found four different fabrics that I liked and cut my own 1.5" strips. It actually did not take long using a rotary cutter and mat. Plus you don't have to worry about the strips being perfect - the basket is supposed to have a scrappy look to it.
2. I wanted a bigger basket that Little Bear could grow with. I enlarged the size of the basket to ~10.5" diameter x ~5.5" tall with a handle that increased the overall height to ~14". Based on these measurements I ended up using ~3/4 yd. of each fabric (3 yards total fabric) and ~60 ft. of size 3 (12/32") piping. To increase the size, simply continue coiling the piping until you reach your desired size!
3. With the increased size, I did not use any of the size 1 piping (6/32"). Instead I used ~12 ft. of the size 3 piping (12/32") to make the handle.
The basket itself was not difficult to make and I really enjoyed it. I especially love that it looks much more difficult than it is. If it hadn't been for the time crunch, it would have been even better! After seeing the joy on Little Bear's face Easter morning, the late nights sewing were definitely worth it. And now we have a special basket to pass on through the years.
At any rate, when I started thinking about Easter this year I wanted to get a special basket that Little Bear could keep and use for years to come. Naturally I figured that anything homemade would have special significance, but how in the world would I make an Easter basket? Never fear - there are more creative bloggers out there than me! And thankfully I found one. :o)
While it was an old post, I found the directions that I needed here, on the Moda Bake Shop blog. For the most part, I followed their tutorial but I did make a few modifications:
1. While the directions say to use a Moda honey bun, I could not find one with colors/patterns suitable for a little boy's Easter basket. Instead, I found four different fabrics that I liked and cut my own 1.5" strips. It actually did not take long using a rotary cutter and mat. Plus you don't have to worry about the strips being perfect - the basket is supposed to have a scrappy look to it.
I used ~3/4 yd. of each fabric to make Little Bear's basket. |
2. I wanted a bigger basket that Little Bear could grow with. I enlarged the size of the basket to ~10.5" diameter x ~5.5" tall with a handle that increased the overall height to ~14". Based on these measurements I ended up using ~3/4 yd. of each fabric (3 yards total fabric) and ~60 ft. of size 3 (12/32") piping. To increase the size, simply continue coiling the piping until you reach your desired size!
3. With the increased size, I did not use any of the size 1 piping (6/32"). Instead I used ~12 ft. of the size 3 piping (12/32") to make the handle.
The basket itself was not difficult to make and I really enjoyed it. I especially love that it looks much more difficult than it is. If it hadn't been for the time crunch, it would have been even better! After seeing the joy on Little Bear's face Easter morning, the late nights sewing were definitely worth it. And now we have a special basket to pass on through the years.
The Easter Bunny filled Little Bear's basket to the brim! |
Monday, April 25, 2011
Little Bear's First Hair Cut
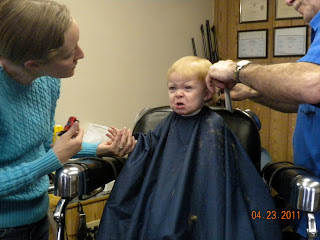
For the holiday weekend, we headed back to my hometown for a visit with NanNan and Pap. While we were there I finally gave in and Little Bear had his first real haircut. We took him to the barber that Pap and Uncle A go to (and my PapPap went to). Pap went first, then Little bear, then Papa Bear - it was a family affair!
He looks so grown up now! Where did my baby go?
Bye Bye baby curls... |
What's up with this big cape? I can't find my hands! |
Here we go! |
I don't know about this... |
Why are there scissors coming at my head? |
Look in the mirror! |
Snip! Snip! |
Why are you taking pictures of this? |
I'm getting tired of this... |
Not my ears! |
Time to bring out the bribes... The cars didn't work, but the promise of cold (ice cream) did! |
All done! |
Look at these handsome guys! |
He looks so grown up now! Where did my baby go?
Saturday, April 23, 2011
Bear Loves Books [2]
Little Bear has found some new favorite books! These are the ones that get a "Read! Read!" and "Again! Again!" rating from Little Bear. Hope that you enjoy!
1. Go, Dog. Go! by P.D. Eastman
2. Global Babies by The Global Fund for Children
3. Listen! What Do You Hear? by J. Jean Roberston
4. Roadwork by Sally Sutton and Brian Lovelock
5. Not a Baby Anymore! by Jorge Uzon
6. Happy Baby ABC by Roger Priddy
Little Bear reading Happy Baby ABC by Roger Priddy (on his new potty of course!). |
1. Go, Dog. Go! by P.D. Eastman
2. Global Babies by The Global Fund for Children
3. Listen! What Do You Hear? by J. Jean Roberston
4. Roadwork by Sally Sutton and Brian Lovelock
5. Not a Baby Anymore! by Jorge Uzon
6. Happy Baby ABC by Roger Priddy
Friday, April 22, 2011
Eggs for Everyone
Are you having company over Easter? Here's an easy way to make personalized omelets for everyone, without having to cook them one at a time. The result - hot, personalized omelets for everyone at the table, at the same time, and only one dirty dish!
2. Provide cheese, bacon, ham, chopped vegetables, etc. Each person can personalize his or her omelet by adding ingredients to the bag.
3. Press out all of the air and seal the bag closed. Use your hands to mash the bag until the yolks are broken and all ingredients are mixed.
1. Distribute freezer storage bags containing 2 eggs to each person. You may want to write names on the bags for easy identification later!
2. Provide cheese, bacon, ham, chopped vegetables, etc. Each person can personalize his or her omelet by adding ingredients to the bag.
This will be a cheese and bacon omelet. |
4. Add bags to a pan of boiling water (multiple bags can be placed in one pan of water).
Subscribe to:
Posts (Atom)